
TL;DR
A closet booth works primarily by reducing reflections and controlling sound bounce, not by blocking sound entirely. Proper placement, absorption, and ventilation are key to a quiet, effective setup, especially when space is limited.
Imagine turning a tiny closet into a quiet, professional-sounding studio. Sounds impossible? Not at all. The secret isn’t just in the foam—it’s in how you place your gear, treat the space, and manage heat. This guide cuts through the noise about acoustic treatment and reveals what really makes a closet rig work.
Whether you’re recording vocals, guitar amps, or AI workstations, understanding the difference between dampening and soundproofing can save you time and money. Plus, you’ll learn why putting distance between you and the noise source often beats endless foam. Ready to transform your small space into a top-tier setup? Let’s go.
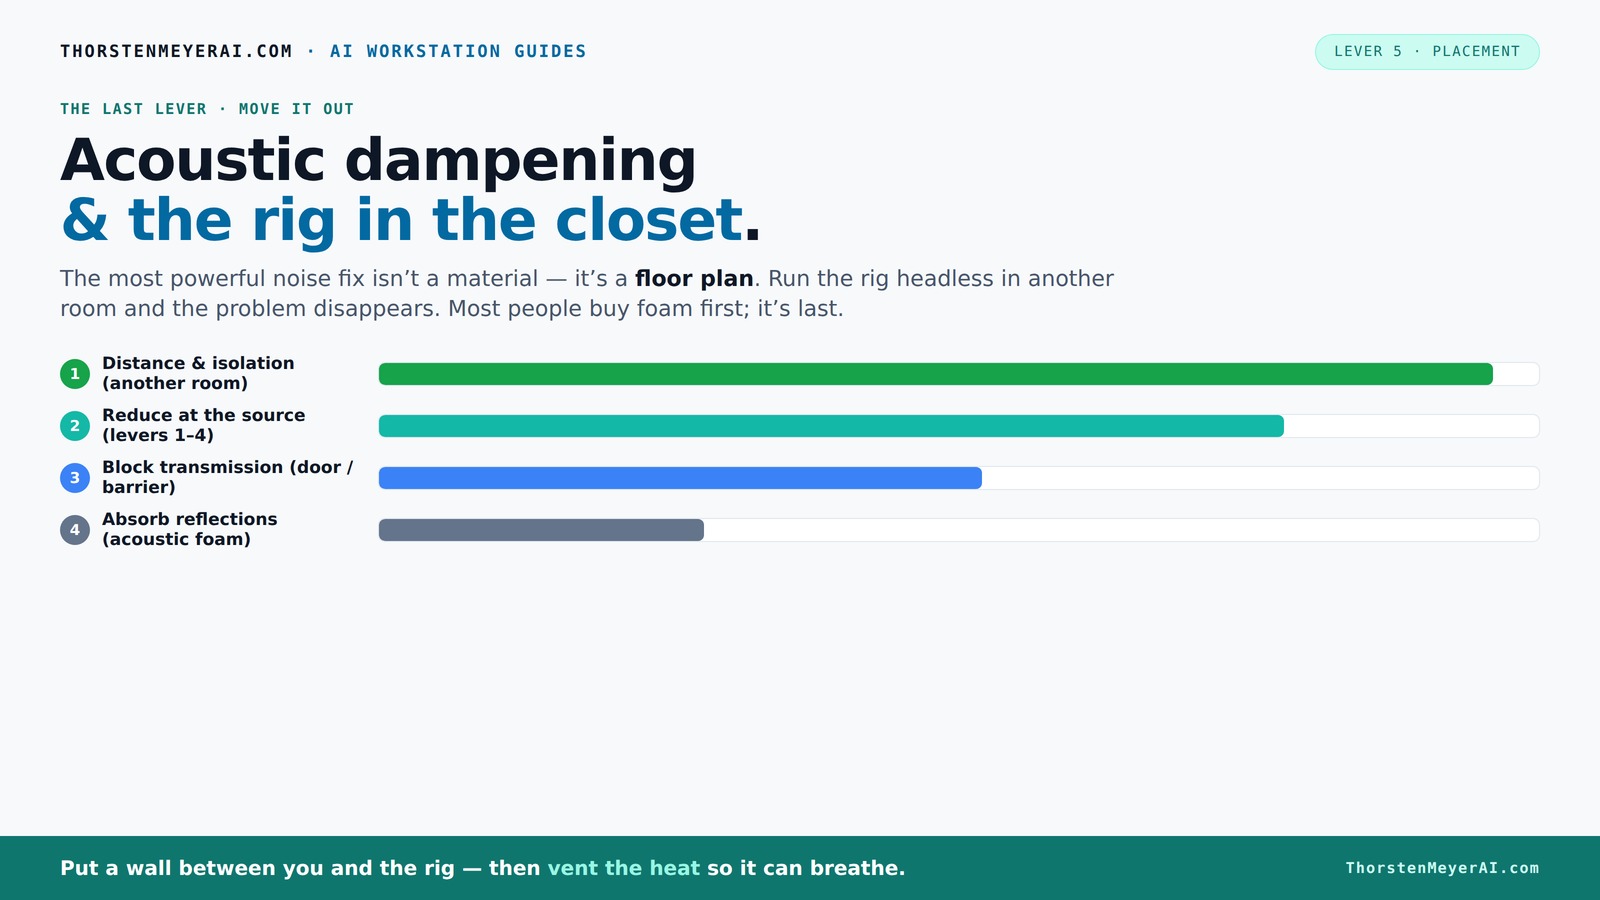
Acoustic dampening
& the rig in the closet.
The most powerful noise fix isn’t a material — it’s a floor plan. A rig you can’t hear because it’s in another room beats any amount of foam. Tap the approaches in Part 1 to see what actually works.
(another room)
(levers 1–4)
(door / barrier)
(acoustic foam)
Contain the noise, not the heat
Key Takeaways
- Distance and isolation are the most effective ways to reduce noise—think beyond foam and into another room if possible.
- Acoustic dampening controls reflections within a small space, but true soundproofing requires sealing gaps and adding mass.
- Placement of your microphone and treatment targets the main reflection points for best results.
- Thicker bass traps and panels are vital for managing low-frequency resonances in tiny closets.
- Ventilation isn’t optional—proper airflow prevents heat buildup that can throttle your system or cause damage.
acoustic foam panels for small studio
As an affiliate, we earn on qualifying purchases.
As an affiliate, we earn on qualifying purchases.
What a closet rig is really for — and what it isn’t
A closet rig isn’t about blocking all sound from escaping or entering. Instead, it’s about controlling reflections, echoes, and resonances within a small space. Think of it as creating a mini-sound chamber where unwanted reverberations vanish.
For example, a singer recording in their closet often notices harsh echoes. Adding foam and diffusers helps tame those echoes, making vocals clearer. But if the goal is silence outside the closet, you need soundproofing—massive, heavy barriers that block sound transmission.
In essence, a closet setup is perfect for isolating sound enough for high-quality recording, without the need for full-on soundproofing walls. This means understanding that the primary benefit is acoustic control, not complete sound isolation. The tradeoff is that small spaces will still leak some noise, but if you focus on reflection control, your recordings will sound much cleaner and more professional, even if some external noise remains audible.
Acoustic dampening vs. soundproofing — what’s the difference?
Acoustic dampening and soundproofing often get confused, but they serve different purposes. Dampening reduces echo, flutter, and harsh reflections inside a space. Soundproofing blocks sound from passing through walls or doors.
In a closet, you add foam or blankets to absorb sound waves bouncing around—dampening. This is crucial because reflections can muddle your recordings and create unnatural echoes that distort your sound. Dampening can be seen as smoothing out the room’s acoustic response, making recordings sound more natural and clear.
However, if you want to stop sound from leaking out or entering, you need to focus on soundproofing—adding mass, sealing gaps, and using barriers. This is a different layer of treatment that often involves more effort and cost. The key is understanding that dampening improves the quality of what you hear directly, while soundproofing aims to prevent sound from escaping or entering, which is often unnecessary in small, shared spaces.
The tradeoff is that effective soundproofing can be expensive and reduce room usability due to weight and construction complexity. Knowing when to focus on dampening versus soundproofing helps you prioritize your efforts and budget effectively.
Best mic and performer placement — get it right first
Your microphone placement is the biggest factor in capturing clean sound. For closet recordings, position the mic about 6–12 inches from your mouth, angled slightly downward. Aim away from the closet door or reflective walls to avoid picking up unwanted bounce.
For example, if your closet has a reflective back wall, place the mic in front of you, facing the room’s open space, not directly into the wall. Use a reflection filter or a portable shield if needed.
Remember, the goal is to minimize early reflections hitting the mic. This often means experimenting with mic angles and distances before adding treatment. Proper placement reduces the need for excessive treatment and helps you achieve clearer recordings with less effort. It also allows you to better understand how your space’s specific reflection points affect your sound, so you can target treatment more effectively.
Where to place foam, blankets, and panels for maximum effect
Placement is everything. Focus on the main reflection points: the wall behind the mic, the ceiling, and the door. Covering about 20–30% of these surfaces can drastically cut echo and flutter echoes.
For example, hanging a thick blanket or acoustic panel on the wall behind your mic reduces bounce-back and flutter echoes. Corner bass traps help tame low-frequency buildup—common in small spaces.
Use thick foam or DIY panels made from rockwool or mineral wool for best low-end control. Remember, the goal isn’t to cover every inch but to target the main reflection paths. Proper placement ensures that the treatment absorbs the sound energy at the right points, preventing reflections from bouncing around and muddying your recordings. Strategic positioning maximizes the impact of your treatment, often reducing the need for excessive coverage.
Handling the door, floor, and corners — sealing and treatment tips
Gaps around the closet door and floor leak sound and undermine your efforts. Seal cracks with weatherstripping or acoustic sealant. This simple step can cut noise leaks by up to 50%, but more importantly, it prevents external noise from entering your recording space, which can cause distractions and reduce clarity.
For the floor, adding a rug or carpet softens reflections and reduces echo. In small closets, thick mats or foam pads on the floor help absorb sound energy from below. Corners are low-frequency hotspots—install bass traps or thicker panels to absorb resonances. Properly sealing and treating these areas creates a more controlled environment, where reflections are minimized and external noise intrusion is reduced, leading to clearer, more professional recordings.
For example, a small closet with a gap under the door can leak loud noise, making recordings inconsistent. Sealing it with weatherstripping makes a noticeable difference in both sound isolation and room acoustics, allowing you to focus on your performance without external distractions.
Common mistakes in tiny booths — and how to avoid them
Many DIYers focus only on foam, forgetting basic setup rules. Covering only the wall behind the mic without sealing gaps or treating corners often leaves room resonances untouched. This oversight can lead to muddled recordings with excessive echo and resonance, especially in small spaces where sound waves bounce rapidly between surfaces.
Another mistake? Using too thin foam for low-frequency control. Thick panels or bass traps are necessary for deep bass issues. Thin foam absorbs high frequencies well but does little for low-end resonance, which is often the real culprit behind boomy, muddy recordings. Combining proper placement of bass traps in corners with thicker panels on reflection points creates a balanced acoustic environment, preventing low-frequency buildup and improving clarity.
For example, a creator covering their closet with foam but leaving gaps around the door still faces echo and noise leaks. Seal gaps first, then add targeted acoustic treatment. This layered approach ensures that both reflections and leaks are addressed, resulting in a much cleaner sound.
Remember, small spaces amplify low frequencies and reflections. Proper placement and treatment matter more than the sheer amount of foam. Strategic, well-planned acoustic treatment yields better results than simply piling on foam indiscriminately.
How to keep your closet cool and safe — the ventilation secret
A sealed closet traps heat, turning a quiet space into an oven. Proper ventilation is non-negotiable when placing a hot, high-power rig in a closet. Overheating not only risks damaging your equipment but can also cause thermal noise, which defeats the purpose of your acoustic efforts.
Use active ventilation: a quiet exhaust fan coupled with passive vents creates airflow, pushing hot air out and pulling cooler air in. This continuous airflow prevents temperature spikes that can reach dangerous levels, especially in small, sealed environments. Without proper ventilation, your system can overheat within minutes, causing shutdowns or damage. Investing in a low-noise fan and venting system ensures your gear stays cool, your environment remains acoustically stable, and safety is maintained.
For example, a GPU rig in a closet with no airflow can overheat in just 30 minutes, risking damage and thermal noise that can ruin recordings. Installing a small, quiet fan and vent keeps the system cool and noise low, making the closet both quiet and safe. Proper ventilation is a crucial layer of your overall setup, ensuring longevity and consistent performance.
Check out [this guide](https://thorstenmeyerai.com/reduce-heat-noise-ai-workstation/) for more on cooling strategies that work in tight spaces.
Frequently Asked Questions
What’s the main difference between acoustic treatment and soundproofing?
Acoustic treatment focuses on reducing echoes and reflections inside a space, making the sound clearer. Soundproofing blocks sound from entering or leaving the room, which requires heavy barriers and isn’t usually feasible in a closet.Where should I put foam or panels in my closet booth?
Place panels at reflection points—mainly behind the mic, on the ceiling, and on the door. Covering about 20–30% of these surfaces can significantly cut down echo and flutter. Corners benefit from bass traps, especially if low-frequency resonance is an issue.Should I face my mic toward the door or away from it?
Point your mic away from reflective surfaces like the door or walls. Angling it slightly downward and toward the room’s open space helps minimize bounce-back and captures clearer sound.Do I need bass traps in a small closet?
Yes, especially if you notice low-frequency buildup or resonance. Thick panels or dedicated bass traps placed in corners help tame these deep tones and improve overall sound quality.How do I keep my closet cool when it’s sealed up?
Install a quiet exhaust fan and passive vents to create airflow. Proper ventilation prevents heat from building up, protecting your equipment and maintaining a quiet environment.Conclusion
Turning your closet into a quiet, effective recording space isn’t about smashing foam everywhere. It’s about smart placement, sealing gaps, and controlling heat. When you think of noise reduction as a layered approach—distance, dampening, and ventilation—you get a setup that’s quiet by design, not by accident.
So next time you see a closet booth in a creator’s video, remember: it’s the strategic choices behind the scenes that make all the difference. Your best sound is just a few smart steps away from being in reach.