To create an elegant black and gold retirement cake step-by-step, gather ingredients and tools like flour, sugar, butter, mixing bowls, and cake pans. Prepare uniform cake layers using a standard recipe, bake, cool, then frost evenly with straight lines for a polished look. Achieve sharp edges by scraping technique and elegant gold dust decorations with alcohol splatter effects. Secure wires with florist tape for cascading designs and adorn with personalized touches like edible gold leaf and black fondant. Pay attention to presentation details, coordinate decorations, and enhance the cake's aesthetic appeal for a visually stunning centerpiece.
Key Takeaways
- Prepare black and gold themed cake with personalized decorations
- Use gold dust for elegant splatter effect on cake
- Document cake design with detailed photography for memories
- Ensure all decorations are food-safe and visually appealing
- Coordinate colors and decorations for a polished and sophisticated look
Amazon Product B0F6CN2TRP
As an affiliate, we earn on qualifying purchases.
Required Ingredients and Tools

To create the Black and Gold Retirement Cake, gather the essential ingredients and tools listed below to guarantee a successful baking process. For the black and gold cake, make sure you have flour, sugar, butter, eggs, vanilla extract, and baking powder. These ingredients are fundamental for achieving a moist and flavorful cake base that will serve as the canvas for your elegant design. In addition to the ingredients, essential tools such as mixing bowls, an electric mixer, cake pans, an oven for baking, a cooling rack for cooling the layers, and an offset spatula for frosting application are necessary for a seamless baking experience.
When considering optional frosting ingredients, powdered sugar, heavy cream, and food coloring can be used to create a luscious and visually appealing frosting to complement the black and gold theme. Moreover, additional tools like piping bags, decorating tips, a cake turntable for easy decorating, and a fondant smoother for a flawless finish will elevate the overall presentation of your masterpiece. Personalized decorations such as edible gold leaf, black fondant, and gold ribbon can add a luxurious touch to your Black and Gold Retirement Cake, making it a stunning centerpiece for any retirement celebration.
Amazon Product B0G7X9884J
As an affiliate, we earn on qualifying purchases.
Preparing the Cake Layers

When preparing the cake layers, it is essential to focus on three key points:
- The cake batter mixture
- Baking the layers
- Cooling and leveling them
These steps are vital for achieving even stacking, a professional appearance, and the best flavor.
Cake Batter Mixture
For the creation of the Black and Gold Retirement Cake, the first step involves preparing the cake layers by utilizing a standard cake batter recipe.
- Use a standard cake batter recipe for the layers.
- Divide the batter evenly among the cake pans for uniform layers.
- Bake the cake layers until a toothpick comes out clean.
Following these steps meticulously guarantees that the cake layers are of the highest quality and will serve as the perfect base for the elegant design of the retirement cake.
The precision in preparing the cake batter mixture is essential for achieving a professional-looking and delicious cake that will impress both visually and in taste.
Baking the Layers
In the process of creating the Black and Gold Retirement Cake, the focus now shifts towards the meticulous baking of the cake layers to guarantee a golden brown finish that signifies both visual appeal and delicious taste. To achieve this, bake the cake layers at 350°F for 25-30 minutes until they exhibit a rich golden hue. Use a toothpick to check for doneness by inserting it into the center of the cake; if it comes out clean, the layers are ready. After baking, allow the cake layers to cool in the pans for 10 minutes before carefully transferring them to a wire rack. Once cooled, use a serrated knife to level the layers for even stacking. Wrap the cooled cake layers in plastic wrap and chill in the fridge before proceeding with the assembly.
| Steps to Bake Cake Layers |
|---|
| 1. Preheat oven to 350°F |
| 2. Bake for 25-30 minutes |
| 3. Check with a toothpick |
| 4. Cool in pans for 10 min |
| 5. Level with serrated knife |
Cooling and Leveling
Cooling and leveling the cake layers is a crucial step in guaranteeing a smooth and stable foundation for the subsequent assembly of the Black and Gold Retirement Cake. To achieve this, follow these key steps:
- Allow cake layers to cool completely before leveling.
- Level cake layers using a serrated knife for even surfaces.
- Crumbs can be removed with a cake brush for a clean finish.
Proper cooling and leveling not only contribute to a professional-looking cake but also ensure that the layers stack securely. This attention to detail in the preparation stage sets the stage for a visually stunning and structurally sound final product.
Amazon Product B0C1Y5VL8D
As an affiliate, we earn on qualifying purchases.
Frosting the Cake

To achieve a smooth and professional finish when frosting the cake, it is essential to pipe straight lines evenly around the cake and employ a scraping technique with agile circular movements for flawless edges. Maintaining a consistent thickness without gaps in the frosting is vital for a polished look. Scraping away from oneself helps create sharp edges on the cake surface. Uneven frosting should be avoided to save time and achieve a neat appearance.
—
| Technique | Description |
|---|---|
| Pipe straight lines | Ensure even distribution of frosting around the cake for a neat finish. |
| Agile scraping motion | Use circular movements when scraping the frosting for smooth edges. |
| Consistent thickness | Maintain an even layer of frosting without gaps for a professional look. |
| Scraping for sharp edges | Scraping away from oneself helps create sharp edges on the cake surface. |
—
Amazon Product B0G3XBC1J8
As an affiliate, we earn on qualifying purchases.
Achieving Sharp Edges

After achieving a smooth frosting application with even distribution and consistent thickness around the cake, the next step towards a professional finish involves mastering the technique of achieving sharp edges.
To achieve sharp edges on your cake, follow these key steps:
- Pipe straight lines evenly: Create a smooth surface by piping straight lines of frosting around the cake. This guarantees a uniform base for achieving sharp edges.
- Maintain consistent thickness: Make sure there are no gaps or variations in thickness while applying the frosting. Consistency is crucial for a polished look.
- Use the scraping technique: Hold the scraper agilely and move it in a circular motion around the cake. Scraping away from yourself helps in creating sharp edges that give a professional finish.
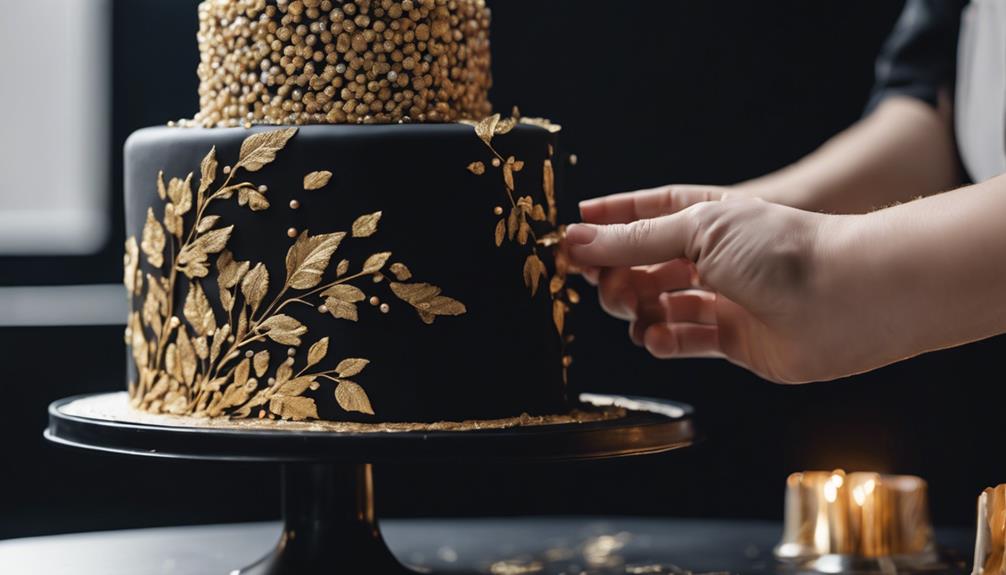
Decorating With Gold Dust

Decorating with gold dust involves mixing it with alcohol to achieve a splatter effect on the cake.
Using a brush with large bristles allows for creating larger splashes of gold dust, and adjusting the brush size helps control the thickness of the splatter pattern.
Assessing the splatter pattern is vital for maintaining consistency in the design, and applying gold dust before inscribing the cake can help keep the inscription clear and defined.
Applying Gold Dust
When aiming to achieve a visually striking effect with gold dust on the retirement cake, incorporating a splatter effect by mixing the gold dust with alcohol is a popular technique. This method allows for a unique and eye-catching design that adds a touch of elegance to the overall look of the cake.
To guarantee the splatter effect is executed flawlessly, consider the following:
- Use a brush with big bristles for creating larger splashes of gold dust.
- Adjust the brush size to control the thickness of the splatter effect.
- Maintain consistency in the splatter pattern for a visually appealing design.
Achieving Shimmering Effect
For an exquisite and luxurious touch, impart a shimmering effect to your retirement cake by skillfully decorating it with gold dust mixed with alcohol.
When applying the gold dust, consider using a brush with big bristles to achieve larger splashes of gold for a more dramatic effect. Adjust the brush size based on your desired outcome, enabling you to regulate the thickness of the gold splatter on the cake surface.
Evaluate the splatter pattern as you work to guarantee consistency and full coverage. Remember to apply the gold dust before adding any inscriptions to the cake to maintain clarity and enhance the visual impact of the shimmering effect.
Mastering this technique will elevate the elegance of your black and gold retirement cake.
Adding Decorative Elements

Consider incorporating elegant decorative elements into your black and gold retirement cake using food-safe methods and secure techniques. When adding decorative elements to your cake, it is vital to guarantee that they are not only visually appealing but also safe for consumption. To achieve this, follow these tips:
- Use food-safe methods to insert wires into the cake for decorative elements.
- Secure wires by taping them with florist tape to make sure of safety.
- Consider a cascading arrangement for decorations for an elegant look.
Final Touches and Presentation
To elevate the overall presentation of the black and gold retirement cake, attention to detail in the final touches is essential. Adding a personalized message or retirement wish on the cake can provide a thoughtful and heartfelt touch, making the cake more meaningful for the retiree. Utilizing a cake stand or a decorative platter is vital in elevating the cake's presentation, creating a visually appealing centerpiece for the celebration. Surrounding the cake with coordinating decorations or flowers can further enhance its aesthetic appeal, giving it a polished and cohesive look.
Displaying the cake in a well-lit area is important to showcase its elegant design and intricate details effectively. By ensuring proper lighting, the cake's black and gold elements can shine, capturing the attention of guests and highlighting its beauty. Before serving the cake, consider taking photos from different angles to preserve and document its exquisite design for lasting memories. These final touches and presentation considerations will contribute to a sophisticated and impressive display befitting a retirement celebration.
Frequently Asked Questions
How to Make Step Cake at Home?
To make a step cake at home, one can start by baking multiple layers of cake in varying sizes, stacking them with frosting in between to create a tiered effect. Carve the edges of each layer with a serrated knife to achieve the step design.
Smoothly frost the cake to cover the carved edges for a seamless look. Decorating with gold and black accents can add an elegant and sophisticated finish to the cake.
How Do You Put Gold Leaf Pieces on a Cake?
When applying gold leaf pieces to a cake, it is important to handle the delicate material with care. Using a soft brush, gently press the gold leaf onto the cake's slightly tacky surface or one brushed with edible adhesive for a seamless appearance.
Practice on a small area first to master the technique, ensuring a professional finish on the cake. Gold leaf adds a luxurious touch, creating elegant, shimmering effects that elevate the overall presentation.
What Is a Vintage Style Cake?
A vintage style cake is a confectionary masterpiece that transports one back to a bygone era, exuding nostalgia, charm, and sophistication. Characterized by intricate details, delicate flowers, lace patterns, and soft color palettes, these cakes are perfect for weddings, anniversaries, and events desiring old-world glamour.
Vintage cake stands, antique toppers, and classic embellishments enhance the overall aesthetic. They are timeless creations that embody elegance and evoke a sense of refined beauty.
How to Make a Gold Cake?
To create a gold cake, one can use edible gold dust mixed with alcohol to achieve a splatter effect. Select a brush with appropriate bristle size for desired splatter thickness.
Evaluate the pattern for consistency before adding any inscriptions. Secure decorative elements with food-safe methods.
Consider a cascading arrangement for decorations and crisscrossing elements for visual appeal. Ensuring precision in application and arrangement will result in a striking gold cake design.
Conclusion
To summarize, crafting an elegant black and gold retirement cake involves meticulous steps and attention to detail. By following the outlined directions, one can achieve a stunning cake that is sure to impress guests.
Remember, 'all that glitters is not gold,' meaning appearances can be deceiving. So, guarantee that your cake not only looks beautiful but tastes delicious as well.
With patience and precision, you can create a memorable dessert for a special occasion.